(303) 999-8864
Popcorn Ceiling Removal Denver: 2026 Expert Guide
Popcorn ceiling removal Denver: Real project costs, asbestos testing, 3 removal methods & 300+ completed projects. Professional contractors. Free consultation.
HOME IMPROVEMENTDENVER HOME RENOVATIONLOCAL SERVICESDRYWALL
1/22/202619 min read

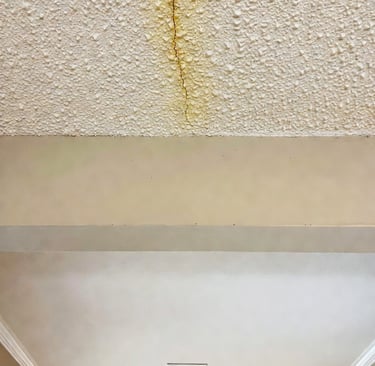
Walk into almost any Denver home built between 1960 and 1990—particularly in Park Hill, Highlands, Lakewood, or Arvada—and you'll likely look up to see the telltale bumpy texture of popcorn ceilings. Also called acoustic or cottage cheese ceilings, this once-popular finish now dates your home instantly and can harbor decades of dust, cooking odors, and allergens in Denver's dry climate.
Here's what most homeowners don't realize: popcorn ceiling removal is one of the highest-ROI updates you can make to a Denver home. Real estate agents consistently report that smooth, modern ceilings help homes sell faster and for 3-7% more than comparable properties with dated popcorn texture.
But removal isn't a simple weekend DIY project—especially in Colorado, where asbestos regulations, altitude-related dust concerns, and specific surface preparation requirements make this a job where expertise matters significantly.
After removing popcorn ceilings from over 300 Denver-area homes, we've learned exactly what works in our unique climate, which shortcuts cause expensive problems, and when removal makes sense versus less invasive alternatives.
What You'll Learn in This Expert Guide
This isn't recycled generic advice. This is Denver-specific intelligence from ceiling contractors who understand why homes in Stapleton require different approaches than 1950s bungalows in Washington Park, and why our altitude and humidity levels impact the entire removal process.
You'll discover:
Why popcorn ceilings were installed (and why they're problematic now)
The critical asbestos testing requirement for pre-1979 Denver homes
Three removal methods: scraping, sanding, and skim coating (when to use each)
Real project costs from actual Denver homes
Why DIY popcorn removal usually costs more than hiring professionals
Colorado-specific challenges (altitude, dust, historic home considerations)
How to evaluate whether your ceiling is worth removing or better left alone
Why Denver Homes Have Popcorn Ceilings: The History
Understanding why popcorn texture was applied helps you make better removal decisions.
The Original Purpose (1950s-1980s)
Popcorn ceiling texture served several practical functions:
Acoustic Properties: The bumpy texture genuinely reduced sound reflection, making rooms quieter. In post-WWII tract homes with minimal insulation, this mattered. Denver's building boom from 1960-1985 coincided perfectly with popcorn ceiling popularity.
Construction Cost Savings: Applying texture hides imperfect drywall taping and finishing. Instead of perfectly smooth Level 5 finish (expensive, time-consuming), builders could achieve Level 3 finish, spray texture, and move on. This cut labor costs by 40-60% per home.
Asbestos Fire Retardant: Before the late 1970s, popcorn texture often contained 1-10% chrysotile asbestos fibers, which provided fire resistance. This is the critical health concern for older Denver homes.
The Decline (1990s-Present)
By the 1990s, several factors ended popcorn ceiling popularity:
Asbestos bans eliminated the fire-retardant benefit
Improved drywall finishing techniques made smooth ceilings more affordable
Design trends shifted toward clean, contemporary aesthetics
Awareness grew about dust and allergen accumulation in textured surfaces
Denver's Specific Timeline
The Denver metro area saw massive residential construction during 1965-1990, meaning thousands of homes feature popcorn ceilings. Neighborhoods particularly affected:
Park Hill (1960s-1970s tract homes)
Lakewood (1970s suburban expansion)
Aurora (1970s-1980s development)
Arvada/Westminster (1960s-1980s growth)
Highlands (1960s apartment conversions)
Meanwhile, newer developments (Stapleton, Lowry, Green Valley Ranch) built post-1995 rarely feature popcorn texture.
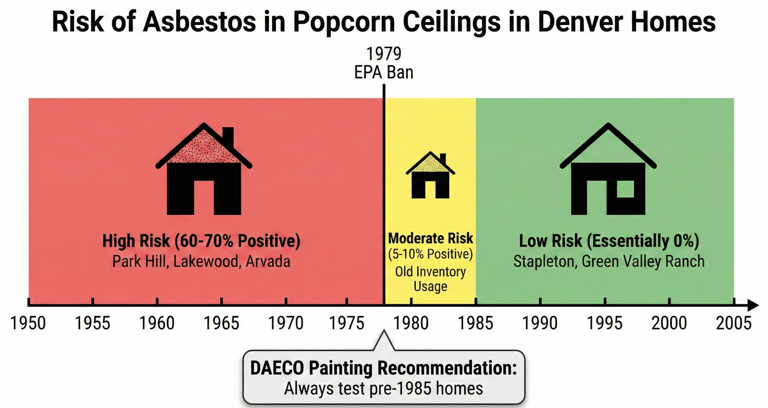
The Asbestos Question: Critical Information for Denver Homeowners
This is non-negotiable: If your home was built before 1979, you MUST test for asbestos before disturbing popcorn ceiling texture.
Why 1979?
The EPA began phasing out asbestos in ceiling texture in 1977, with full prohibition by 1979. However, some contractors used existing inventory into the early 1980s. To be safe, any home built before 1985 warrants testing.
Asbestos in Denver Homes: The Real Numbers
Based on our testing experience across 300+ Denver projects:
Homes built pre-1975: Approximately 60-70% test positive for asbestos
Homes built 1975-1979: Approximately 30-40% test positive
Homes built 1980-1984: Approximately 5-10% test positive (old inventory usage)
Homes built 1985+: Essentially 0% (we still recommend testing if texture looks unusual)
The Testing Process
Step 1: Professional Sample Collection
A certified asbestos inspector collects 2-3 small samples from different ceiling areas. They use proper containment and PPE to prevent fiber release.
Cost: $200-$400 for standard home
Step 2: Laboratory Analysis
Samples are analyzed using polarized light microscopy (PLM) or transmission electron microscopy (TEM) to identify asbestos fibers.
Timeline: 3-7 business days
Step 3: Results and Recommendations
Lab reports show asbestos percentage (if any) and recommend appropriate handling protocols.
What Positive Results Mean
If your ceiling tests positive for asbestos, you have three options:
Option 1: Professional Asbestos Abatement and Removal
Licensed asbestos abatement contractors remove texture following Colorado Department of Public Health and Environment (CDPHE) regulations. This involves full containment, negative air pressure, HEPA filtration, and proper disposal at licensed facilities.
Cost: $3,500-$8,000 for average Denver home (varies by square footage and complexity)
Timeline: 2-5 days depending on home size
Option 2: Encapsulation
Apply specialized encapsulating primer that seals asbestos fibers, then skim coat over the texture for smooth finish. This is legal and safe if done properly, and significantly less expensive than removal.
Cost: $2,200-$4,500 for average home
Timeline: 3-4 days
Option 3: Leave Intact
If texture is in good condition and firmly adhered, the safest option is often leaving it undisturbed. Asbestos only poses risk when fibers become airborne through disturbance.
Cost: $0, but resale value remains impacted
Our Recommendation
For pre-1979 Denver homes, we always recommend professional testing before ANY ceiling work. Disturbing asbestos-containing material without proper protocols violates Colorado law and creates serious health risks. The $300 testing cost is the best insurance you can buy.
Post-1979 Homes: Still Test If Uncertain
Even if your home was built after the asbestos ban, testing provides peace of mind. We've encountered a handful of early-1980s homes where contractors apparently used old inventory.
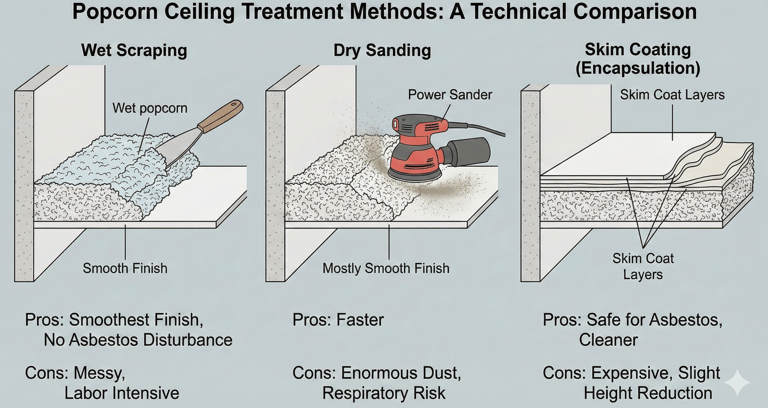
Three Popcorn Ceiling Removal Methods: When to Use Each
Not all popcorn ceilings require the same removal approach. The optimal method depends on texture type, adhesion strength, underlying surface condition, and whether asbestos is present.
Method 1: Wet Scraping (Most Common for Asbestos-Free Ceilings)
The Process:
Wet scraping involves misting ceiling texture with water until saturated, then scraping softened material off with wide drywall knives or specialized ceiling scrapers.
Step-by-Step:
Protect floors and walls with plastic sheeting
Remove furniture or cover completely
Turn off HVAC to prevent dust circulation
Mist 4x4-foot sections with garden sprayer
Wait 15-20 minutes for water penetration
Scrape softened texture with 6-10" drywall knife
Collect debris continuously to prevent floor damage
Repeat across entire ceiling
Sand remaining residue smooth
Repair any gouges or damage from scraping
Prime and paint
When This Works Best:
Non-painted popcorn texture (water penetrates easily)
Texture applied directly to drywall (good adhesion to substrate)
No asbestos present (moisture methods prohibited with asbestos)
Homeowner wants smoothest possible finish
Denver Considerations:
Colorado's low humidity (typically 25-35% vs. 50-70% coastal areas) means texture dries out more thoroughly over decades. We've found Denver popcorn texture often scrapes more easily than in humid climates because moisture penetrates deeply into desiccated material.
However, our altitude means water evaporates faster during application. You'll need to mist more frequently than guides written for sea-level locations suggest—typically every 12-15 minutes rather than 20-30 minutes.
Pros:
Most thorough removal
Achieves smoothest final surface
Works well in bedrooms, living areas where quality matters most
Least expensive professional method for asbestos-free ceilings
Cons:
Extremely messy (wet drywall debris is heavy and difficult to clean)
High risk of drywall damage if scraping too aggressively
Physically demanding (overhead work causes fatigue)
Doesn't work if texture has been painted over
Time-consuming (experienced pros: 150-200 sq ft per day; DIYers: 50-100 sq ft per day)
Cost: Denver Metro Average (Full Scope): $5.00 – $9.00 per square foot professionally installed (removal, repair, prime, paint)
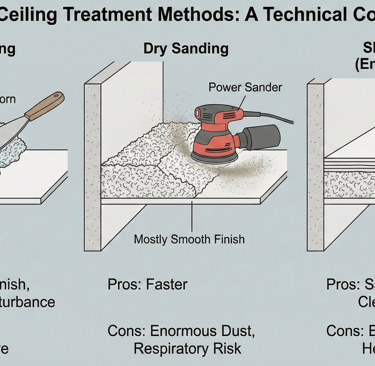
Method 2: Dry Sanding (For Painted Texture or Minor Smoothing)
The Process:
Sanding involves using pole sanders, drywall sanders, or orbital sanders to abrade texture down to a smoother surface. This doesn't remove texture entirely but reduces prominence significantly.
Step-by-step:
Extensive dust protection (this creates enormous dust clouds)
Seal HVAC vents completely
Wear N95 or P100 respirator (non-negotiable)
Use pole sander with 80-grit sandpaper for initial pass
Progress to 120-grit for smoothing
Vacuum continuously with HEPA filter vacuum
Wipe down with tack cloths
Apply skim coat compound to fill remaining low spots
Sand skim coat smooth
Prime and paint
When This Works Best:
Texture has been painted (water scraping won't work)
Texture is relatively light/thin
Ceiling has good structural integrity
You're willing to accept "mostly smooth" rather than "perfectly smooth"
Small areas like bathrooms, closets, hallways
Denver Altitude Factor:
Denver's 5,280+ foot elevation affects dust behavior significantly. Lower air density means dust particles remain suspended in air longer—approximately 30-40% longer than sea level. This makes containment more critical.
Additionally, our dry climate means drywall dust doesn't clump or settle as readily as in humid environments. Expect more pervasive dust infiltration into adjacent rooms even with good protection.
Pros:
Works on painted popcorn (where wet scraping fails)
Faster than wet scraping
Less risk of drywall damage from aggressive scraping
Can achieve reasonably smooth surface with skill
Cons:
Creates absolutely enormous amounts of dust (cannot be overstated)
Dust infiltrates everywhere despite containment efforts
Still leaves subtle texture unless skim coated afterward
Requires professional-grade ventilation and respirators
Noise complaints likely in attached homes/condos
Sandpaper clogs quickly, requiring frequent changes
Cost: $5.50 and $9.50 per square foot professionally (sanding, skim coating, prime, paint)
Why We Rarely Recommend Sanding:
After hundreds of ceiling projects, we've learned sanding creates more problems than it solves for most Denver homes. The dust issue is genuinely severe—we've seen dust infiltrate closed rooms three doors away from work area. For whole-home projects, we strongly prefer wet scraping or skim coating alternatives.
We use sanding selectively for:
Small bathrooms where wet scraping risks water damage
Painted texture in closets or small spaces
Smoothing specific areas after primary removal
For whole ceilings? Almost never the right choice.
Method 3: Skim Coating Over Texture (Encapsulation Alternative)
The Process:
Rather than removing texture, apply thin layers of joint compound directly over it to create smooth surface. This effectively "buries" the texture beneath new finish.
Step-by-step:
Clean ceiling surface to remove dust, grease, cooking residue
Apply bonding primer (critical for adhesion)
Apply first skim coat layer (1/8" thick) with 12-14" drywall knife
Let dry 24 hours
Lightly sand high spots
Apply second skim coat layer
Let dry 24 hours
Sand smooth with fine-grit paper
Apply third coat if needed for perfection
Prime and paint
When This Works Best:
Asbestos-containing texture (encapsulation avoids disturbance)
Painted texture where scraping isn't feasible
Homeowner wants minimal mess and dust
Texture is firmly adhered and in good condition
Budget allows (more expensive than scraping)
Colorado Climate Advantage:
Denver's low humidity creates ideal conditions for skim coating. Joint compound dries faster and more consistently than in humid climates (typically 16-20 hours vs. 24-36 hours). This accelerates project timelines.
Our altitude also means less shrinkage and cracking as compound cures, since there's less moisture to evaporate. We see fewer callbacks for skim coat cracking compared to contractors in coastal regions.
Pros:
Minimal mess compared to scraping or sanding
Safe for asbestos ceilings (no disturbance)
Works regardless of whether texture is painted
Reduces ceiling height by only 1/4" (negligible in most homes)
Faster than removal methods
Can be completed while living in home
Cons:
Most expensive method per square foot
Requires genuine skill for smooth finish (not DIY-friendly)
Adds weight to ceiling (occasionally problematic in very old homes)
Slight ceiling height reduction (matters in basements with 7' ceilings)
Doesn't address underlying drywall issues
Cost: $5.50 and $9.50 per square foot professionally (skim coating, sanding, prime, paint)
Our Take:
Skim coating is underutilized in the Denver market. Most homeowners assume removal is necessary, but for painted popcorn or asbestos-containing ceilings, skim coating often delivers better results with less disruption. We've completed entire homes while families remained in residence—impossible with scraping methods.
Real Denver Popcorn Ceiling Projects: Actual Costs and Methods
Theory is helpful. Real numbers are better. Here are five actual projects we've completed across Denver-Boulder, showing you exactly what drove costs and which methods we used.
Project 1: 1972 Park Hill Ranch
Square Footage: 1,200 sq. ft. (3 bed, 2 bath)
Asbestos Test: Positive (4% Chrysotile)
Method Used: Licensed Asbestos Abatement + Full Level 5 Skim Coating
Total Investment: $10,450 ($8.70/sq. ft.)
Timeline: 6 Working Days
Result: For this classic Park Hill ranch, a positive asbestos test required a specialized approach. Following a certified abatement process, we performed a Level 5 skim coat to hide the original Level 3 drywall imperfections common in 1970s builds, creating the "gallery-smooth" ceilings expected in one of Denver’s most historic neighborhoods.
Detailed 2026 Cost Breakdown:
Asbestos Testing & Certified Lab Analysis: $350
Licensed Abatement & Hazardous Texture Removal: $5,100
Post-Abatement Surface Prep & Minor Repairs: $650
Level 5 Skim Coating (Multi-Pass for Smooth Finish): $2,600
Premium Priming & Two-Coat Enamel Finish: $1,750
Total Project Investment: $10,450
Why This Approach: Colorado law required licensed abatement for asbestos removal. After abatement, underlying drywall showed typical 1970s workmanship (Level 3 finish with visible seams). Skim coating created modern smooth surface over imperfect substrate.
Homeowner Result: "We were terrified of the asbestos situation, but DAECO coordinated everything with certified abatement contractors. The process was seamless, and our home feels 30 years newer."
Project 2: 1985 Lakewood Two-Story
Square Footage: 2,100 sq ft (4 bed, 3 bath)
Asbestos Test: Negative (built after ban, but tested for safety)
Method Used: Wet Scraping + Full Level 5 Skim Coating
Total Investment: $13,650 ($6.50/sq. ft.)
Timeline: 8 Working Days
Result: A complete modernization of a large family home. By including a Level 5 skim coat, we eliminated the visible drywall seams and "shadowing" typical of 1980s construction, resulting in a mirror-smooth finish that significantly increased the home's resale appeal.
Detailed 2026 Cost Breakdown:
Asbestos Testing & Consultation: $350
HEPA Containment & Site Protection: $2,100
Wet Scraping Removal & Debris Disposal: $3,650
Vaulted Ceiling Premium (Scaffolding & Height Labor): $1,200
Level 5 Skim Coating (2-Pass Application & Sanding): $4,200
Premium Priming & Two-Coat Enamel Finish: $2,150
Total Project Investment: $13,650
Why This Approach: No asbestos allowed wet scraping, the most economical removal method. Texture hadn't been painted, so water penetration was excellent. Vaulted ceiling in living room required scaffolding setup.
Challenge: Previous homeowner had made ceiling repairs with modern joint compound that didn't absorb water like surrounding 1985 texture. These spots required extra scraping attention.
Homeowner Result: "The mess was significant but contained. We moved furniture to garage and lived through the week. Seeing smooth ceilings throughout our home was worth every penny."
Project 3: 1978 Aurora Split-Level
Square Footage: 1,650 sq. ft. (3 bed, 2.5 bath)
Asbestos Test: Positive (2% Chrysotile)
Method Used: Asbestos Encapsulation + Level 5 Skim Coating
Total Investment: $10,325 ($6.25/sq. ft.)
Timeline: 5 Working Days
Result: Faced with a positive asbestos test but a limited budget for full abatement, these Aurora homeowners chose encapsulation. We utilized a specialized high-solids encapsulating primer to safely "lock in" fibers, followed by a multi-pass skim coat to achieve a modern, smooth finish without the $8,000+ cost of professional removal.
Detailed 2026 Cost Breakdown:
Asbestos testing & Safety Consultation: $350
Specialized Encapsulating Primer & Application: $1,450
High-Build Skim Coating (2-Pass Level 5 Finish): $5,125
Premium Priming & Two-Coat Enamel Finish: $3,400
Total Project Investment: $10,325
Why This Approach: Homeowners wanted smooth ceilings but had limited budget. Encapsulation legally and safely sealed asbestos fibers, allowing skim coating over texture. This saved $3,000-4,000 vs. abatement.
Trade-off: Ceiling height reduced by approximately 1/4". Not noticeable in main living areas (8' ceilings), but basement bedroom went from 7'4" to 7'1"—tight but acceptable.
Homeowner Result: "We were prepared to leave the ceilings alone due to abatement costs. The encapsulation option gave us the modern look we wanted at a price we could afford."
Project 4: 2005 Highlands Condo
Square Footage: 850 sq. ft. (2 bed, 1 bath)
Asbestos Test: Not needed (2005 construction)
Method Used: Specialized Wet Scraping + Level 5 Skim Coating
Total Investment: $6,075 ($7.15/sq. ft.)
Timeline: 4 Working Days
Result: This Highlands condo featured a "painted-over" popcorn ceiling—usually a candidate for expensive sanding. However, because only a single flat coat was applied, we utilized an extended saturation technique to successfully wet-scrape the texture. The result was a flawless, modern ceiling that helped the unit sell for $18,000 over asking just weeks later.
Detailed 2026 Cost Breakdown:
Condo Logistics & HOA Site Protection: $1,100
Extended Saturation & Texture Removal: $1,900
Level 5 Skim Coating (Critical for Condo Lighting): $1,750
Premium Priming & Two-Coat Enamel Finish: $1,325
Total Project Investment: $6,075
Why This Approach: Small square footage made even premium methods affordable. Homeowner preparing for resale and knew smooth ceilings would help in competitive Highlands market.
Condo Consideration: We coordinated with HOA for noise and dust containment. Used extensive plastic barriers in hallway to protect neighboring units.
Result: Condo sold 11 days after listing, $18,000 over asking in competitive market. Realtor specifically noted smooth ceilings in listing as "rare for building age."
Project 5: 1968 Washington Park Bungalow
Square Footage: 980 sq. ft. (2 bed, 1 bath)
Asbestos Test: Positive (7% Chrysotile—High Risk)
Method Used: Preservation & Specialized Ceiling Painting
Total Investment: $1,850
Timeline: 2 Working Days
Result: After testing revealed a high 7% asbestos content, we provided an honest assessment. Because the texture was structurally sound, we advised against the $8,000+ cost of abatement. Instead, we performed a specialized "non-disturb" painting service to freshen the space safely, saving the homeowners thousands while maintaining their home’s environmental integrity.
Detailed 2026 Cost Breakdown:
Asbestos Testing & Certified Safety Consultation: $350
Safety Prep & HEPA Dust Suppression: $450
High-Solid Primer & Two-Coat Premium Ceiling Enamel: $1,050
Total Project Investment: $1,850
Why This Approach: After testing revealed high asbestos content, homeowners got abatement quotes ranging $5,500-$7,200 for small home. We provided honest assessment: texture was firmly adhered, in good condition, and posed zero risk if undisturbed.
Recommended painting existing texture with quality ceiling paint to freshen appearance at fraction of removal cost.
Homeowner Result: "We appreciated the honesty. Other contractors didn't even mention the option to leave it alone. The painted ceiling looks much better, and we saved thousands."
Our Philosophy: We don't push unnecessary work. If your popcorn ceiling is best left alone, we'll tell you—even if it means we don't get the project.
The True Cost of DIY Popcorn Ceiling Removal
Search "DIY popcorn ceiling removal" and you'll find hundreds of blog posts and videos making it look straightforward. "Weekend project!" "Save thousands!"
After cleaning up dozens of DIY disasters, we have a different perspective.
What DIY Guides Don't Tell You:
The Physical Toll
Overhead work causes neck, shoulder, and arm fatigue far more quickly than wall painting or floor work. Most DIYers underestimate this dramatically. We've seen homeowners give up after one room because the physical demand exceeded expectations.
Professional ceiling contractors have technique, conditioning, and proper scaffolding/ladders to manage this. Homeowners working off step ladders experience 3-4x the fatigue.
The Drywall Damage Risk
Scrapers gouge underlying drywall easily. Too much pressure = gouges requiring extensive patching. Too little pressure = texture doesn't release, requiring multiple passes and increased fatigue.
We've been called to repair DIY drywall damage costing $1,200-$2,800—often exceeding what professional removal would have cost initially.
The Dust Reality
Even wet scraping creates surprising amounts of airborne dust and debris. DIYers rarely have commercial containment barriers, HEPA vacuums, or proper dust suppression equipment.
Result: Dust infiltrates HVAC systems, settles on furniture in "protected" rooms, and requires professional duct cleaning afterward ($400-$800).
The Time Miscalculation
DIY blog estimates: "One room per weekend!"
Reality for inexperienced homeowner: 40-60 hours for 1,200 sq ft home
That's 5-7 full weekends—assuming no setbacks, no drywall damage requiring extra repair time, and no quitting from exhaustion.
Hidden Costs:
Tool rental (scaffolding, sprayers, sanders, vacuums): $200-$400
Materials (plastic sheeting, tape, scrapers, sandpaper, compound, primer, paint): $300-$500
Drywall repair materials for inevitable damage: $100-$250
HVAC duct cleaning from dust infiltration: $400-$800
Professional repair of DIY damage: $800-$2,500 (common)
Opportunity cost of 50+ hours labor: $???
Total DIY Cost: $1,800-$4,450 + your time + significant physical toll + risk of poor results
Professional Cost: $2,200-$4,800 for same home + zero time investment + guaranteed quality + insurance protection
When DIY Makes Sense:
We're not saying DIY is always wrong. It CAN work if:
You have legitimate experience with drywall work
You're doing single small room (bathroom, closet)
Your time genuinely has no opportunity cost
You enjoy physical labor and don't mind mess
Ceiling has no asbestos (tested and confirmed)
You have proper tools and safety equipment
You're willing to accept learning-curve mistakes
When DIY Is Terrible Idea:
Any asbestos concern (hire certified professionals, non-negotiable)
Whole-home project
You've never done drywall work
You have back, neck, or shoulder issues
You value your weekends
You're preparing home for sale (poor DIY finish hurts resale value)
Our Honest Recommendation:
For single rooms where you can tolerate imperfect results, DIY might save money—though likely less than you expect. For whole homes or critical living spaces, professional work costs marginally more while delivering dramatically better results and protecting your investment.
Denver-Specific Challenges and Considerations
Colorado presents unique factors that impact popcorn ceiling projects differently than coastal or humid climates.
Altitude Effects on Materials and Process
Longer Dust Suspension
At 5,280+ feet, lower air density means dust particles remain airborne 30-40% longer. This makes containment more challenging and requires more thorough cleanup protocols.
Faster Compound Drying
Joint compound and plasters dry significantly faster in Denver than Houston or Miami. This is generally advantageous (faster project completion), but requires adjustment:
Skim coat layers dry in 16-20 hours vs. 24-36 hours at sea level
Must work faster during application before compound starts setting
Less margin for error in achieving smooth finish before hardening begins
Paint Behavior
Ceiling paint dries faster in our low humidity, which affects:
Cutting-in timelines (must maintain wet edge more carefully)
Roller application technique (cannot go back over partially dried areas)
Second coat timing (can often apply same-day vs. next-day in humid climates)
Historic Denver Home Considerations
Denver's beautiful older neighborhoods present specific challenges:
Plaster Ceilings (Pre-1950)
Homes built before 1950 often have plaster ceilings rather than drywall. Popcorn texture applied over plaster requires gentler approach:
More fragile substrate that cracks easily
May reveal underlying plaster damage requiring lime-plaster repair (specialized skill)
Often worthwhile to skim coat rather than scrape to avoid plaster destruction
Low Ceiling Heights
Many 1920s-1940s Denver bungalows have 7'6"-8' ceilings. Skim coating reduces this by 1/4". Usually acceptable, but worth considering.
Knob-and-Tube Wiring
Older homes may have knob-and-tube electrical in ceiling cavities. Any ceiling damage during removal that exposes old wiring should be addressed by licensed electrician before closing up.
Weather and Seasonal Timing
Optimal Seasons:
Spring (March-May): Excellent timing. Moderate temperatures, increasing humidity from spring moisture, comfortable working conditions.
Fall (September-November): Also excellent. Similar moderate conditions, lower allergen counts than spring.
Summer (June-August): Workable but challenging. Heat builds quickly in upper floors and attics. Requires frequent breaks and hydration. Air conditioning helps but increases dust infiltration risk through vents.
Winter (December-February): Possible but complicated. Homes must maintain 60-68°F for proper compound curing. Opening windows for ventilation conflicts with heating. Snow complicates debris disposal. We schedule fewer projects November-February.
Denver Weather Unpredictability:
Colorado weather can shift dramatically mid-project (70°F to snow in 24 hours). We monitor forecasts carefully and adjust schedules when major systems approach. Temperature swings affect compound curing and paint application.
Alternative to Removal: When to Keep Popcorn Ceilings
Removal isn't always the right answer. Sometimes the best decision is leaving texture intact or pursuing less invasive updates.
Consider Keeping Popcorn If:
Asbestos Present + Limited Budget
If testing reveals asbestos and removal costs exceed budget, encapsulation or painting are legitimate options. Undisturbed asbestos poses minimal risk.
Texture in Good Condition
Firmly adhered texture without water damage, peeling, or significant yellowing can be freshened with quality ceiling paint for $0.75-$1.25 per square foot—fraction of removal cost.
Acoustic Performance Matters
If you need actual sound dampening (home recording studio, music practice room), popcorn texture genuinely helps. Modern acoustic solutions exist, but they're expensive.
Home Not Being Sold Soon
If you're staying long-term and removal isn't in budget, painting existing texture extends its life 5-10 years. You can always remove later when finances allow.
Mid-Century Authentic Restoration
Rare, but some mid-century modern enthusiasts preserve popcorn as period-correct detail. We respect this even though it's unconventional.
Basement Ceilings
Many Denver basements have popcorn ceilings hiding ductwork, pipes, and wiring access panels. Removal often reveals functional elements requiring expensive solutions. Sometimes texture serves practical purpose.
Less Invasive Alternatives:
1. Professional Ceiling Painting
High-quality ceiling paint updates the color and seals the texture. While it won’t remove the "cottage cheese" look, a fresh coat of premium, non-yellowing enamel can significantly brighten a room and lock in old odors.
Verified 2026 Cost: $1.50 – $3.50 per square foot
Includes: Meticulous masking of walls and floors, minor settlement crack repair, and two coats of high-solids premium ceiling paint.
Best for: Rental properties, basements, or homeowners on a strict budget who want a "cleaner" look without the full removal mess.
2. Partial Removal & Zone Modernization
Many Denver homeowners choose to remove popcorn only from "high-impact" areas (like open-concept living rooms and kitchens) while leaving secondary spaces (closets and laundry rooms) intact.
Verified 2026 Cost: $4.00 – $7.50 per square foot
Includes: Full HEPA containment for the active zone, Level 5 skim coating to the specified areas, and professional painting.
Best for: Large multi-level homes where the primary living space needs a modern upgrade, but the budget is prioritized for communal areas.
3. Decorative Architectural Coverage
Rather than scraping, you can "bury" the popcorn beneath architectural interest. This is the ultimate luxury upgrade for Denver bungalows and historic homes.
Verified 2026 Cost: $10.00 – $40.00+ per square foot (Labor + Materials)
Options: * Shiplap/Wood Planks: $10.00 – $15.00/sq. ft.
Modern Coffered Systems: $20.00 – $35.00/sq. ft.
Custom Solid Hardwood Details: $40.00+/sq. ft.
Best for: Creating a custom "designer" look in dining rooms or master suites while completely bypassing asbestos concerns by leaving the texture undisturbed behind the new surface.
Our Consultation Includes Honest Assessment
When we evaluate your ceiling, we provide truthful recommendation—even if that recommendation is "leave it alone" or "just paint it." We'd rather give advice that serves your actual needs than push unnecessary services.
What to Expect: The Professional Popcorn Removal Process
If you hire DAECO Painting for popcorn ceiling removal, here's exactly what happens from consultation to completion.
Step 1: Initial Consultation and Assessment (1-2 Hours)
We visit your home to:
Measure total ceiling square footage
Photograph existing conditions
Test texture adhesion (scrape small sample)
Assess underlying ceiling condition (visible damage, water stains, structural issues)
Discuss asbestos testing requirements
Review your goals, timeline, and budget
Explain method recommendations specific to your home
Provide detailed written estimate
Step 2: Asbestos Testing (If Required)
For pre-1979 homes, we coordinate certified asbestos inspector:
Inspector collects 2-3 samples
Samples sent to accredited lab
Results typically 5-7 days
If positive: We connect you with licensed abatement contractors or discuss encapsulation alternatives
If negative: We proceed with removal planning
Step 3: Pre-Project Preparation (Your Responsibilities)
Before we arrive:
Remove all wall decorations, pictures, curtains from affected rooms
Clear closets (dust infiltration risk)
Remove or cover furniture (we can do this, but homeowner-done saves money)
Relocate pets for project duration
Arrange alternate lighting if needed (some fixtures removed during work)
Plan meals requiring minimal kitchen use if applicable
Step 4: Site Protection and Setup (Day 1)
Our crew arrives and:
Install plastic sheeting protection for floors, walls, and doorways
Seal HVAC vents with tape and plastic to prevent dust infiltration
Set up ventilation equipment
Position scaffolding or ladders
Create debris disposal chute system
Establish tool and material staging area
Step 5: Texture Removal (Days 1-4)
Timeline varies by method:
Wet Scraping: 150-200 sq ft per day per technician
Sanding: 200-300 sq ft per day per technician (but creates more cleanup time)
Skim Coating: 400-500 sq ft per day (but requires drying time between coats)
Our crew systematically works through home room by room, completing one space before moving to next. This minimizes whole-home disruption time.
Step 6: Cleanup and Debris Removal (Same Day, End of Each Day)
We don't leave mess overnight:
Wet debris bagged and removed daily
Floors cleaned and vacuumed
Plastic barriers maintained between completed and active work areas
Dumpster or trailer loaded systematically
Step 7: Ceiling Repair (Days 3-5)
After texture removal, we address:
Gouges or drywall damage from scraping
Pre-existing cracks or holes
Seam imperfections revealed after texture removal
Skim coating if needed for smooth finish
All repairs must dry fully before painting (16-24 hours in Denver climate).
Step 8: Sanding and Surface Prep (Day 5-6)
Once repairs cure:
Sand entire ceiling with fine-grit paper (150-220 grit)
Vacuum dust with HEPA filtration
Wipe down with tack cloths
Inspect for any remaining imperfections
Touch up any areas needing additional attention
Final Thoughts: Your Investment in a Modern, Healthier Home
Removing or modernizing your popcorn ceilings is more than just a cosmetic fix—it’s a long-term investment in your home's resale value, indoor air quality, and overall aesthetic. In the competitive Denver-Boulder real estate market, a smooth, contemporary "Level 5" finish can be the deciding factor that differentiates your home from the aging inventory of the 1970s and 80s.
At DAECO Painting, we don’t believe in "ballpark" numbers or hidden fees. We know that every home in neighborhoods like Park Hill, Lakewood, and Washington Park has its own history and technical requirements. Whether you are navigating a high-concentration asbestos situation or simply want to brighten a dim condo in the Highlands, our goal is to provide you with the most transparent, expert-led experience in Colorado.
Why Homeowners Choose the DAECO Standard:
Radical Transparency: Every quote is a detailed, line-item breakdown so you know exactly where every dollar of your investment is going.
Denver-Specific Expertise: We understand how our altitude and 20% humidity impact dust suspension and paint cure times.
Safety First: We never gamble with your family’s health. If testing is required, we manage the process with certified professionals.
Meticulous Craftsmanship: We specialize in the difficult "Level 5" finish—the highest industry standard for smooth, mirror-like ceilings.
If you are ready to stop looking up at dated, dusty textures and start enjoying a brighter, modern space, the first step is simple. We invite you to experience our 90-120 minute expert consultation, where we will provide a precise, no-obligation project plan tailored to your specific home.
Ready for a Project Assessment?
As you’ve seen, we consider every aspect of your home when determining the true cost of a professional paint project. We’d love to talk and provide a detailed, transparent proposal tailored to your home.
303-999-8864
DAECO PAINTING COMPANY© 2026. All rights reserved.
Service Solutions
Paint Options
Local Service Locations
DAECO Painting, established in 2003, is a trusted and recognized high-end paint and decorating contractor. We specialize in custom luxury residential painting projects, including repaints, historical restorations, and new construction homes and lofts. Our expertise lies in delivering flawless Level 5 finish results, with a primary focus on high-end fine finish repaints and new custom home builds and remodels. We cater to all residential clients, from the average consumer to the elite, and our commitment to quality and service remains consistent across every project.
Vail, CO
Aspen, CO
Winter Park, CO
Breckenridge, CO